First Cluster
This guide will help you add and manage your first Proxmox VE cluster.
Prerequisites
Before adding a cluster, you need:
- A running Proxmox VE cluster or node
- A user account with API access permissions
- PveSphere system properly installed and configured
Adding a Cluster
Step 1: Log in to the System
- Access the PveSphere frontend application
- Log in with the default account or your created administrator account
Step 2: Enter Cluster Management
- In the left navigation bar, click "PVE Management" > "Datacenter"
- Click the "+Add Cluster" button in the top right corner
Step 3: Get API Token
Before filling in cluster information, you need to obtain a Proxmox VE API Token first. There are two ways to get it:
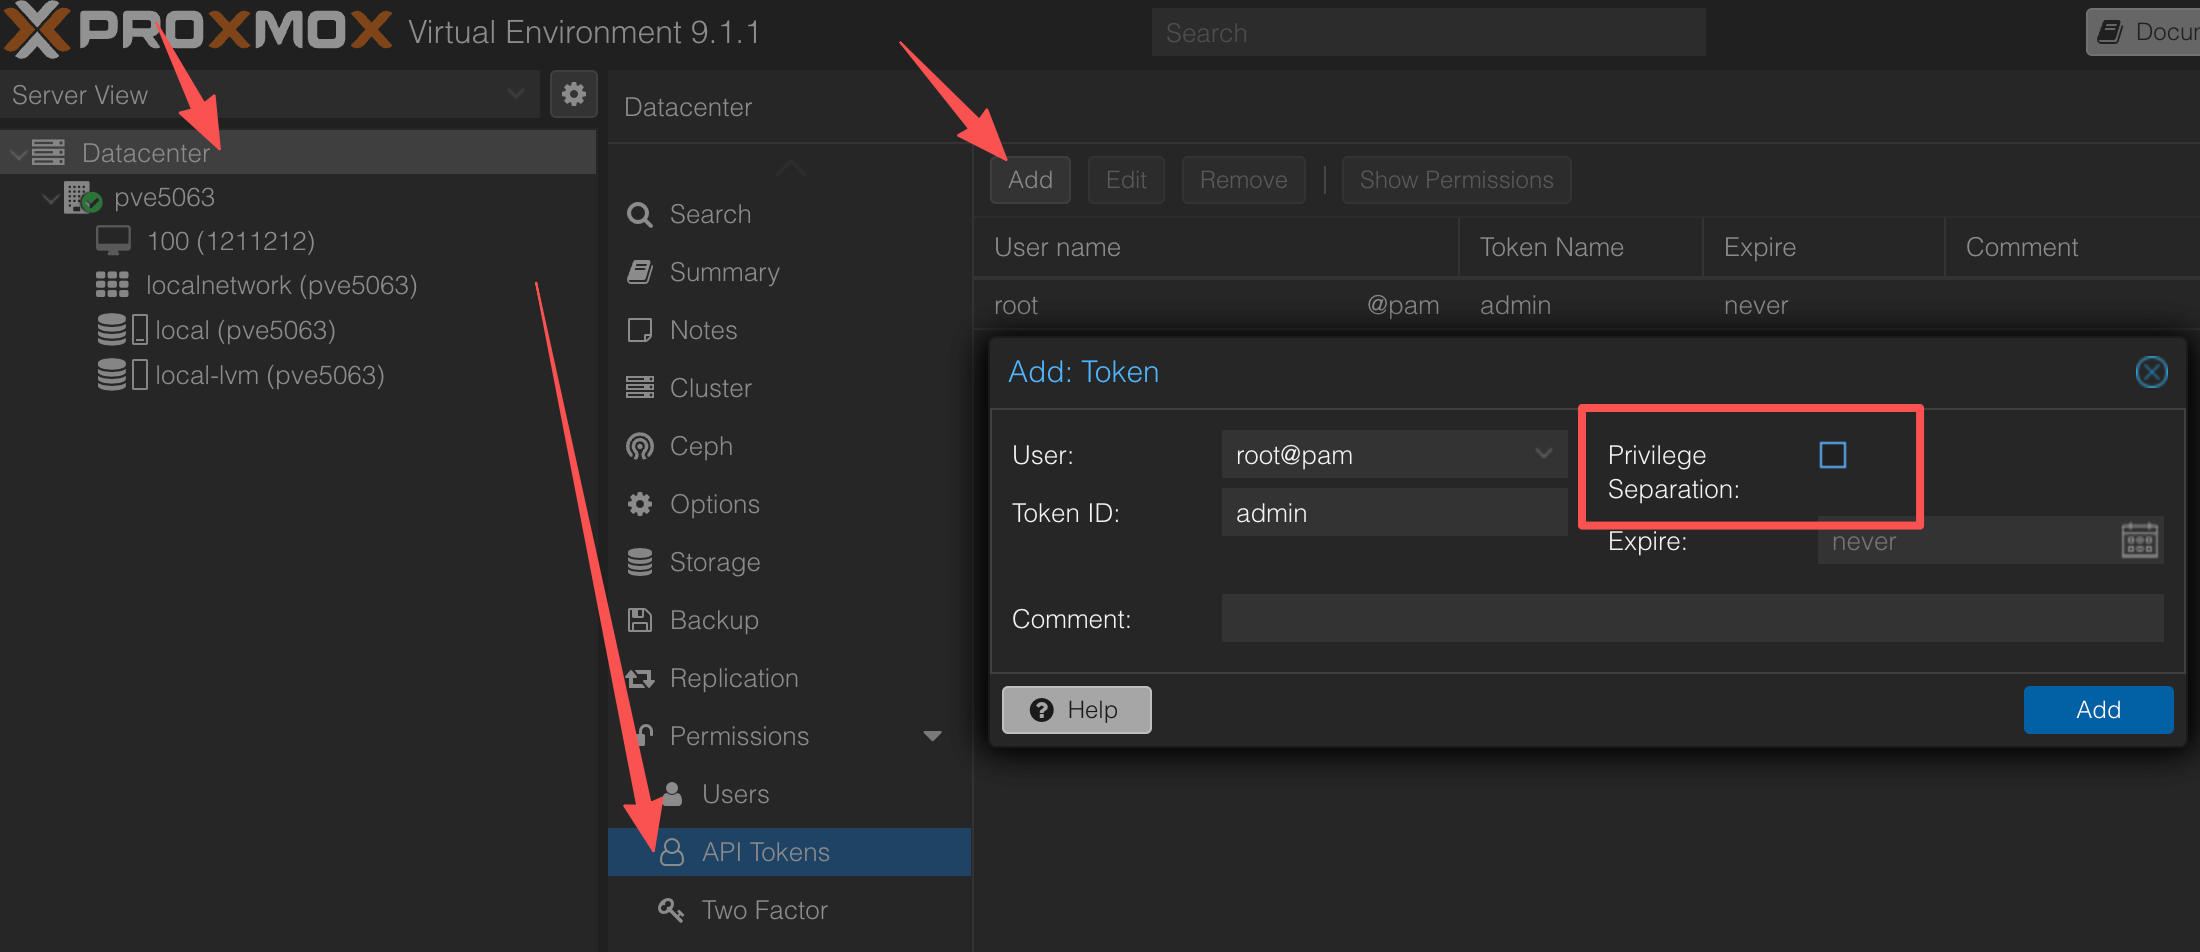
Method 1: Get via Proxmox Web Interface
- Log in to the Proxmox Web interface
- In the left navigation bar, select Datacenter
- Expand the Permissions menu
- Click Users > API Tokens
- Click the Add button in the top right corner
- In the popup dialog, fill in:
- User: Select a user (e.g.,
root@pam) - Token ID: Enter a token name (e.g.,
admin) - Privilege Separation: Select as needed (recommended to uncheck)
- Expire: Set expiration time (or select
never) - Comment: Add a comment (optional)
- User: Select a user (e.g.,
- Click Add to create the token
- Record the generated token value (format:
username!TokenName=TokenValue)
Method 2: Get via Proxmox CLI
Execute the following command on the Proxmox node:
pveum user token add root@pam admin --privsep 0 --comment "API token for automation"
After execution, the command will return token information:
┌──────────────┬──────────────────────────────────────────────────────┐
│ key │ value │
╞══════════════╪══════════════════════════════════════════════════════╡
│ full-tokenid │ root@pam!admin │
├──────────────┼──────────────────────────────────────────────────────┤
│ info │ {"comment":"API token for automation","privsep":"0"} │
├──────────────┼─────────────────────────────�─────────────────────────┤
│ value │ 4caeacb5-eaf3-4b86-8e64-83e8873d589c │
└──────────────┴──────────────────────────────────────────────────────┘
Important Notes:
- The value of
full-tokenid(e.g.,root@pam!admin) will be used as the Username field value - The value of
value(e.g.,4caeacb5-eaf3-4b86-8e64-83e8873d589c) will be used as the Password field value
Step 4: Fill in Cluster Information
In the add cluster dialog, fill in the following information:
- Cluster Name: Cluster name (e.g.,
pve-cluster-01) - Name: Display name (e.g.,
Production Cluster) - API URL: Proxmox VE API address (e.g.,
https://pve.example.com:8006) - Username: Proxmox VE API username or Token ID (e.g.,
root@pam!admin) - Password: Proxmox VE API Token value (e.g.,
4caeacb5-eaf3-4b86-8e64-83e8873d589c) - Env: Environment type (test/dev/prod)
- Datacenter: Datacenter name
- Region: Region identifier
Step 5: Verify Connection
Click the "Test Connection" button to verify that the API connection is working properly.
Step 6: Save Cluster
After verification passes, click "Save" to save the cluster configuration.
Managing Clusters
View Cluster Status
In the cluster list, you can view:
- Cluster status (Enabled/Disabled)
- Scheduling status (Schedulable)
- Number of nodes
- Number of virtual machines
- Storage usage
Enable/Disable Cluster
- Click "Enable" or "Disable" in the cluster action menu to enable or disable the cluster
- Disabled clusters will not participate in scheduling and monitoring
Edit Cluster
Click "Edit" in the cluster action menu to modify cluster configuration.
Delete Cluster
Click "Delete" in the cluster action menu to delete the cluster (please use with caution).
Next Steps
After successfully adding a cluster, you can:
- View Dashboard Features to learn how to monitor resources
- View Node Management to learn how to manage nodes
- View VM Management to learn how to manage virtual machines